Showing posts with label Cooking with Kids. Show all posts

Monday, November 22, 2010

Turkey Place Setting Tutorial

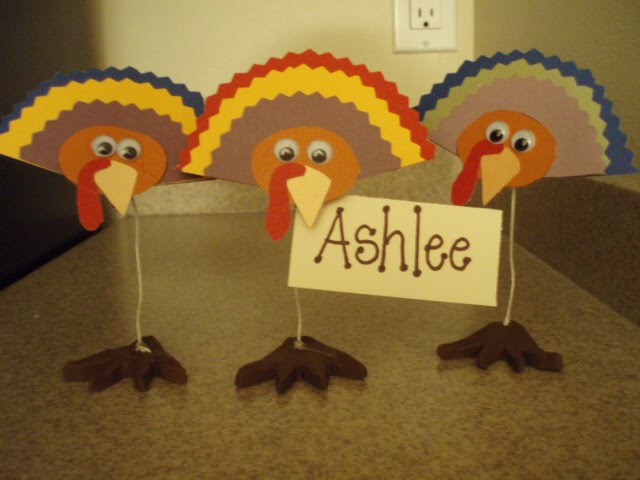
We are now down for the count and the BIG Turkey day is only a couple days away! I am so excited to dive into all that luscious food and do the back stroke! I can't wait! One of my responsibilities this year is to make the Place settings for the BIG FEAST. I wanted to get my little guy involved in this project and so I went roaming the net to find a cute idea that would be kid friendly and adorable. Never fear, your Culinary Queen did not come up empty handed!! These adorable TURKEY PLACE SETTINGS caught my eye. I can't think of a better way to welcome your guests to the table then these adorable big-footed feathered friends. I couldn't wait to make these, so I went right to work and hopped in the car and headed to my favorite craft store in the whole wide world for supplies: HOBBY LOBBY! They have everything under the sun!! I know of no other store that offers the kind of variety that they do! It truly is my home away from home. After my not so brief visit to my second home(I always get distracted in such a place as Hobby Lobby), I went to work assembling these darling feathered friends with my kidlets. I hadn't planned on sharing this craft but decided that it was just too cute not to share! I think that this would a wonderful craft to keep the kids/guests busy while they are waiting for that delicious turkey dinner!
To make your own Thanksgiving Turkey Place Settings, follow this easy and simple tutorial-

Thanksgiving Turkey Place Setting Tutorial


Supplies:
Tan polymer clay, approximately 1 ounce per foot base. (I used the Premo by Sculpey in Brown)
Butter Knife
Card stock in 6 colors, including light brown, tan, white and
red or whatever card stock you have on hand. (Preferably Fall hues)
Double sided tape or glue dots
Glue and Glue Gun
Googly Eyes
Colored marker or crayons for writing names on name cards
Mini Clothespins

Step One:
For each turkey, mold 1 ounce of clay into 1/2 inch thick fan shape
then use a butter knife to cut V shapes for toes. Make a small hold in the middle of the foot base by pushing floral wire halfway through. Make sure you don't push wire all the way through. Re
move the wire and bake the clay according to the package directions. Mine was in a 275 degree oven for about 15-20 minutes.
Step Two:
Meanwhile, push one end of a 6 inch piece of floral wire through the metal spring of a mini clothes pin (the beak), bend it around the pin and twist it back around the wire. Next use scissors or pinking shears to cut out 3 semi circles in graduated sizes from different colors of card stock. Cut a small light brown oval for the head, a tan beak and a red wattle. You can down load the templates right here.
Step Three:
Stick together all the card stock pieces and glue with your
glue dots or double sided tape. I hot glue gunned my googly eyes and the assembled card stock turkey to the clothes pin for extra hold! You don't want a googly eye falling off into your yams or smashed potatoes and gravy! :D
Step Four:
When your clay foot base is cooled, insert the wire into hole. If it fits to loosely then add a drop of hot glue from your glue gun to make sure that it securely holds.
Step Five:
You're almost there!! Now make personalized name cards for your guests. This is where I am going to get my little guy involved. He is working on his penmanship and this is a perfect way to let him practice! ;) After you are done with your personalized
name cards clip them to the turkey's beak! Hurray!!! Now go and put your feet up and relax and enjoy the Thanksgiving Holiday!


Happy Turkey Day!

I

Ashlee, The Culinary Queen

Thursday, October 28, 2010

White Chocolate Popcorn

I made this recipe with my little boy last night. He loves to help his mom in the kitchen. I also really enjoy having him by my side. It is fun to have some mother son bounding time! I wanted to give this recipe a try and thought it would be a wonderful recipe to
get my little boy in the kitchen, but also to satisfy my craving for something sweet! I love that this recipe calls for ingredients that you have on hand in your pantry: popcorn, shortening and two bags of white chocolate chips. The only other additional ingredients that you may have to pick up are peanuts and m&m's. This recipe is an easy one to make. It takes a total of 45 minutes from start to finish before you can start enjoy this yummy popcorn but it is worth the wait!! This recipe is a wonderful one to make for a party, or to surprise a neighbor.

White Chocolate Popcorn
adapted from the kitchen of "Jamie cooks it up!"

Ingredients:
2 bags of Microwave Popcorn
2 bags of White Chocolate Chips
1 T. Shortening
1 c. M&M's
1 c. Nuts, (peanuts, cashews work great too!)

Directions:
Pop your popcorn according to package directions. Put your white chocolate in a microwave safe bowl. Heat for 30 seconds and stir until melted. Make sure you heat chocolate in 30 second increments, you dont want to take the chance and burn your chocolate.Once your chocolate is melted, add shortening and mix with chocolate until it melts in with chocolate.
Place your popcorn in a really large bowl, pour warmed chocolate over popcorn. Stir until popcorn is coated with the chocolate. Add your m&m's and nuts and stir until well combined. Spread coated popcorn onto 2 cookie sheets lined with wax paper. spread evenly. Let cool for 30 minutes or until set. After 30 minutes, break into pieces and enjoy or package up in cute packages and surprise a friend or neighbor with a sweet treat!

I

Ashlee, The Culinary Queen

Sunday, October 24, 2010

Sugar Cookies

I added this sugar cookie recipe to my recipe book two years ago. One of my darling neighbors brought over these sugar cookies for a Christmas neighbor gift. They were so good that Mark and I hid from our kids and ate every last crumb. They truly are that good!! What is wonderful with this recipe is that you can change the flavor of the dough and frosting by using several different extracts such as: vanilla, almond or lemon. My favorite is the almond and is what I use every time I make these yummy cookies. I started the tradition of making these sugar cookies with my kids each Halloween, Christmas and Valentines day Holiday. It does take some time to make these but are well worth the wait. It is also fun because you can decorate these cookies to your liking and imagination!! I hope you all enjoy this recipe because it truly is one of our family favorites!
I made these cookies with my kids a few weeks ago and we decorated them in very cute Halloween fashion. We delivered them to our neighbors and they were delighted for an early Halloween treat!
My lil' chef! Isn't he cute?

Sugar Cookies
recipe adapted from the kitchen of Brittany Brown

Ingredients:
1 c. shortening (butter flavor)
2 c. sugar
2 eggs
1 c. Sour Cream
1/2 tsp. salt
1 tsp almond extract( you can use lemon or vanilla)
1/2 tsp. baking soda
4 tsp.baking powder
5 1/2 c. Flour

Mix ingredients together and roll thick. Bake in a 375 degree oven for 8 1/2 minutes or until golden brown.

Frosting:
1 cube butter, softened
1- 3oz. cream cheese
1 tsp. almond extract (or you can use lemon or vanilla)
1 lb. powdered sugar
Mix ingredients together until fluffy and thick. Sometimes I add a Tablespoon or two of milk so the frosting is a thick and creamy texture. Add any food coloring of your choice, frost cookies and enjoy!!

I

Ashlee, The Culinary Queen

Related Posts Plugin for WordPress, Blogger...