Showing posts with label Tutorials. Show all posts

Thursday, March 31, 2011

Little Grow Peep Topiary Tutorial


HAPPY SPRING! 

Both of these crafts make me HAPPY!


The Daffodil was by My Little Guy. He made his darling flower during his art class in Kindergarten this week! It was so cute and bright that I put it up on his artwork board in his room so our whole family could admire it when we come in out and out of his room during the day!  I also appreciated the fact that the center of my little guys daffodil was made with a cupcake liner. So cute!

This Tute also makes me giddy with excitement! Spring is here and that means (hopefully) no more SNOW for me and those that live in my neck of the woods!
I am not holding my breath though... I do live in Northern Utah and we are known for having Snow Fall as late as June! Uggg! Please send Warm Wishes my way! Please? I need to thaw out! :D


With the Welcoming of Spring, we also have the Easter Holiday just around the corner! I came across this Darling Peep Topiary Idea in the April Edition of Women's Day Magazine. I thought that it was such a darling craft that I wanted to make a couple to add to my existing supply of Easter Decor.

 This Craft is "cheep" and easy and is made using a classic Easter Candy. I love the results!

Now, Let's get on with the Tute why don't we?

 Supplies needed to Make ONE "Peep" Topiary:

4 inch Green Flower Foam
Newspaper
41/2 X 5 green mini flowerpot (Found some cute ones on Sale at Hobby Lobby in their Garden Dept.)
11 inch dowel
Green Paint- I used Delta Creative Ceram Coat "Leaf Green" (Find it at your local Craft Store with the other Acrylic Paints
1/2" paintbrush
Hot Glue gun and Glue sticks
6" plastic embroidery hoop (I purchased mine from Hobby Lobby and bought the Susan Bates Hoop-La Brand embroidery hoop.)
3 packages of 5- count yellow chick Peeps marshmallow candies
Green Decorative Easter Grass
Ribbon (Green or Yellow)

How to assemble your Peep Topiary:

Step 1. Place the green foam length wise into your pot. Make sure it fits snugly and isn't visible over the top of the edge of your pot.


Step 2. Paint your wooden dowel green  and let it completely dry. I didn't take a picture of this because I figure we all know how to paint. *Wink*

Step 3. Take the inside piece of the Embroidery loop out and discard or save for another craft. After you have separated the embroidery hoop, apply a generous amount of hot glue to the top of the dowel and secure it to the screw at the opening of the embroidery hoop. Let Dry.


Step 4. Remove Peeps from the package but DO NOT SEPARATE!! Apply a thick line of hot glue to 1/3 of the front side of the embroidery ring. Gently press on group of five peeps onto the glue with beaks facing  the center of the circle, slightly bending them to cover the ring. Let Dry. I held mine in place for a few minutes until the Glue hardened. Repeat with the other two groups.


Step 5: Stick the bottom part of the dowel into the center of the foam so that the stem stands upright. Cover the top of the pot with green Easter grass. If desired, lightly mist the Peeps Flower with a Craft Sealer to Preserve it. 

Step 6: Take your ribbon (any Color) and tie a bow or a knot in the middle of your wooden dowel for a little extra pizazz. 

Pat yourself on the back for finishing this cute Craft. Now that your finished, go and display your cute little Peep Topiary in a place where you can admire it all through the Easter Holiday!

This is would be a darling Centerpiece for your Easter Feast!


HAPPY CRAFTING!

I

Ashlee, The Culinary Queen

Wednesday, December 22, 2010

Spiced-Gingerbread Men Tree Ornaments

Several years ago, my very talented mom made me and my four other siblings, 15 of the most darling non-edible Gingerbread men ornaments that I had ever seen! I was truly touched by my mom's thoughtful gift and have cherished these heirlooms. These little gingerbread men captured my heart (just like my husband did 7 years ago-sorry some times I get a little "scent"amental" *giggle*) and the ornaments have adorned our tree each year since my mom made them for me! My two little munchkins also love these ornaments not only because Nanna D made them for us but they smell "scentsational" as well! There is not a day that goes by during the month of December that I don't see one or both of my children hovering near the Christmas tree trying to see if they can smell the apple/spiced men! Even though they require a little time and effort to make, these Gingerbread men ornaments are very easy to assemble. The recipe calls for ingredients that you probably already have in your spice cabinet or pantry. After you assemble a soft-like cookie dough mixture you roll it out and cut out your men. Then after baking them in the oven for 2 1/2 hours, you are ready to assemble your men with ribbon, acrylic and puffy paints. This is a fun activity or may even be a new tradition to get the whole family involved!


Apple & Spice Gingerbread Men Ornament Tutorial

Ingredients:
*Note* I'd like to suggest buying your spices at a Dollar store if you are planning on making several batches because spices are not cheap and this with help cut costs!)

1 c. Cinnamon
1 T. nutmeg
1 T. Ginger
1 T. Ground Cloves
1 T. Allspice
3/4 c. Applesauce (You want to use store bought not homemade. I like Western Family!)

Directions:
1.) In a medium bowl combine all the spices and mix thoroughly with a spoon until all the spices are well combined.


2.) Add the applesauce and stir. To mix it well, I use my hands and mix it for 2-3 minutes or until the mixture is combined and makes a soft dough. If the dough is too dry and crumbly add 1-2 teaspoons of extra applesauce.


3.) Turn dough out onto a counter top and knead dough for 2-4 minutes or until the dough resembles cookie dough.

4.) Roll out dough to a 1/4" thickness. Make sure not to roll out too thin because they will fall apart. You want your ornaments to be sturdy and not break or crumble. Cut out your shapes using a metal cookie cutter.


5.) Transfer the cut outs to a un-greased cookie sheet. I like to use the air bake cookie sheets.

6.) Take a chopstick or pencil and and make a hole at the top of each of your ornaments.


7.) Bake in a 150 degree F. oven for 1 hour. (My oven didn't go down to 150 degrees so I baked mine at 170 degrees F. Don't forget to enjoy your house smelling like Christmas while your cookies bake!

8.) When the cookies have baked for one hour remove from oven and place on a cooling rack. Then immediately place the cooking rack into a baking sheet and then place back into the oven at 150 Degree F for another 1 1/2 hours. This will help harden your cookies.


9.) After baking time is over take out of oven and let cool completely. Place in an airtight container until ready to decorate or to store completed ornaments.


To Decorate You will need:
Ribbon, I chose Burgundy because that is the color of my tree
Glue
Glue Gun
White puffy paint
Black or Dark Blue Acrylic Paint
Thick Gold Thread or Ribbon
Black Sharpie

Directions:
1.) Take your tole paint and using the end of a chopstick or tole painting brush dip in paint and make dots for eyes and the corners of the mouth. Then take your Sharpie Pen and draw a semi circle connecting the mouth.


2.) To make buttons on the Ginger bread men, dip tole paint brush or chopstick and make 3 circles down the middle of the Ginger bread mens chest.

3.) To make the white curly q's around the gingerbread mens arms and legs, take your White puffy paint and make a squiggly design around each. Allow to dry for 4 hours.

4.) After four hours you are ready to glue on a bow around the Gingerbread Men's Neck. I tied several little bow and then took my glue and glue gun and placed a dot of glue under the gingerbread men's smiles. Adhere bow to glue. Let dry.


5.) After the ornament has dried completely, now string your gold thread through the hole at the top of your Gingerbread Men's head and tie a knot. Repeat on all the other little men.

6.) Pat yourself on the back for finishing this long process and now proudly go hang your ornaments on your tree where everyone can see and "smell" your handywork!
Yields 12-15 gingerbread men.

I dub thee a Culinary Queen!

* Since this is a family recipe please note that if you share or blog about this tutorial please give credit where credit is due! Thank you!* -Ashlee

Merry Christmas Culinary Queen Bee Readers!
I hope you all Have a wonderful Holiday and New Year!
Come Back next week to see what I have been up to- See you next week!

I

Ashlee, The Culinary Queen

Monday, November 22, 2010

Turkey Place Setting Tutorial

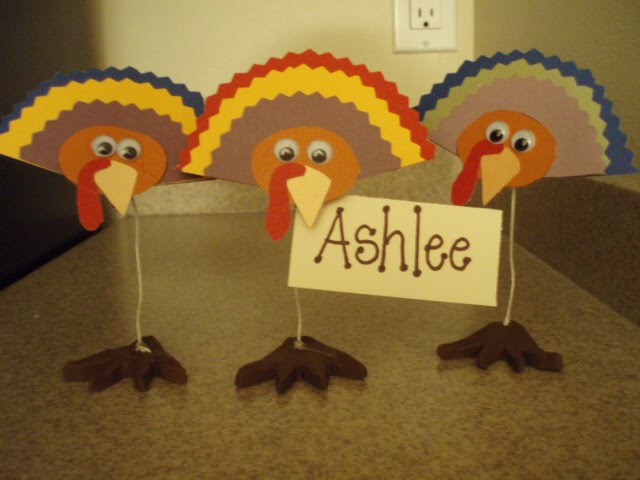
We are now down for the count and the BIG Turkey day is only a couple days away! I am so excited to dive into all that luscious food and do the back stroke! I can't wait! One of my responsibilities this year is to make the Place settings for the BIG FEAST. I wanted to get my little guy involved in this project and so I went roaming the net to find a cute idea that would be kid friendly and adorable. Never fear, your Culinary Queen did not come up empty handed!! These adorable TURKEY PLACE SETTINGS caught my eye. I can't think of a better way to welcome your guests to the table then these adorable big-footed feathered friends. I couldn't wait to make these, so I went right to work and hopped in the car and headed to my favorite craft store in the whole wide world for supplies: HOBBY LOBBY! They have everything under the sun!! I know of no other store that offers the kind of variety that they do! It truly is my home away from home. After my not so brief visit to my second home(I always get distracted in such a place as Hobby Lobby), I went to work assembling these darling feathered friends with my kidlets. I hadn't planned on sharing this craft but decided that it was just too cute not to share! I think that this would a wonderful craft to keep the kids/guests busy while they are waiting for that delicious turkey dinner!
To make your own Thanksgiving Turkey Place Settings, follow this easy and simple tutorial-

Thanksgiving Turkey Place Setting Tutorial


Supplies:
Tan polymer clay, approximately 1 ounce per foot base. (I used the Premo by Sculpey in Brown)
Butter Knife
Card stock in 6 colors, including light brown, tan, white and
red or whatever card stock you have on hand. (Preferably Fall hues)
Double sided tape or glue dots
Glue and Glue Gun
Googly Eyes
Colored marker or crayons for writing names on name cards
Mini Clothespins

Step One:
For each turkey, mold 1 ounce of clay into 1/2 inch thick fan shape
then use a butter knife to cut V shapes for toes. Make a small hold in the middle of the foot base by pushing floral wire halfway through. Make sure you don't push wire all the way through. Re
move the wire and bake the clay according to the package directions. Mine was in a 275 degree oven for about 15-20 minutes.
Step Two:
Meanwhile, push one end of a 6 inch piece of floral wire through the metal spring of a mini clothes pin (the beak), bend it around the pin and twist it back around the wire. Next use scissors or pinking shears to cut out 3 semi circles in graduated sizes from different colors of card stock. Cut a small light brown oval for the head, a tan beak and a red wattle. You can down load the templates right here.
Step Three:
Stick together all the card stock pieces and glue with your
glue dots or double sided tape. I hot glue gunned my googly eyes and the assembled card stock turkey to the clothes pin for extra hold! You don't want a googly eye falling off into your yams or smashed potatoes and gravy! :D
Step Four:
When your clay foot base is cooled, insert the wire into hole. If it fits to loosely then add a drop of hot glue from your glue gun to make sure that it securely holds.
Step Five:
You're almost there!! Now make personalized name cards for your guests. This is where I am going to get my little guy involved. He is working on his penmanship and this is a perfect way to let him practice! ;) After you are done with your personalized
name cards clip them to the turkey's beak! Hurray!!! Now go and put your feet up and relax and enjoy the Thanksgiving Holiday!


Happy Turkey Day!

I

Ashlee, The Culinary Queen

Thursday, July 29, 2010

Monogram Door Hanger


I know I have mentioned that I have been in a little bit of a Summer Time Slump and even though my kitchen is rearranged I felt like I needed another project to look forward to this week. I took down all my 4th of July Decorations this week and so my house is looking a little bare. My front door is especially looking a little bare, so I decided to change that. I don't have a wreath that I can use that is in between holidays and In an effort to find something that I could use during Holiday Down time, I came up with this little wreath idea. I have always loved Monogrammed things! In an effort to get some ideas I searched the internet but nothing really fancied my liking so I came up with this idea!
Supplies:
A wreath of your choice, I love square wreaths!
Paint
Wooden Letter
Ribbon of your Color Choice

Step One: Paint your letter of the color of your choice, let dry and then spray with your choice of finishing spray. This will seal in the paint and protect it from the sun! Then sand edges to give it that Shabby Chic look!
Step Two: Make a bow and fasten it to the middle of your wreath.
Step Three: String your ribbon around your letter and tie onto wreath. If you make your bow large enough it will cover the knots! Viola! Your done!

I

Ashlee, The Culinary Queen

Sunday, July 18, 2010

Little Girl's Bow Holder Tutorial

A few months ago, I saw the most darling bow holder on a random blog. It was darling but contained limited instructions on how to make it. I decided that it didn't look too complicated to make and I knew that I could replicate it and make one for my little girl. I have been looking for a cute bow holder for quite some time that could hold all of my daughters bows but nothing really sought my fancy. This one is the perfect size and will keep all of my little girls bows in mint condition. I wished I had done this sooner!

If you want to make one of these darling bow holders for the little princess in your life, these are the supplies you will need:

Supplies Required:
Fabric, your choice of color*
*(I got 1 yd of fabric for my bow holder but how much
fabric you get will depend on how big your frame is)
Picture frame
chicken wire or plastic mesh
Ribbon to match your fabric
hot glue gun
glue
Step One:
Iron and fold fabric in half. When fabric is smooth and wrinkle free, place the backing of the picture frame onto the fabric. You will glue the fabric with your glue gun to the backing (removable stiff part that goes in last after placing a picture in a frame) of the picture frame.Step Two:
Leave about an 1 to 1 1/2 inches of fabric around the edge of the frames backboard. You will now cut the corners edges to resemble mine. This will give you a nice finished look for the back of bow holder.
Step Three:
Glue around the the picture frame, fold and secure fabric to the cardboard backing including the corners and fold fabric into place.This is what your edges will look like after you have glued around and secured the fabric around the cardboard backing.Step Four:
Cut out enough chicken wire or plastic mesh to cover the cardboard backing. Leave enough around the edges of the backing. You will be gluing the mesh to the back of your cardboard to secure it into place.Step Five:
After you have cut a generous amount of mesh to go over and around your cardboard backing, start by securing every other dot of the mesh with a drop of glue. Hold the mesh in place until the glue cools and mesh stays in place on its own. Make sure to pull tight along the way so that the front side is flush with the fabric front and there are no bubbles. Step Six:
When you have secured the plastic mesh in place all around the cardboard backing, turn over and make sure it is flush against the fabric. If there is any bubbles adjust the mesh and make as tight as you can. Next, Take the picture insert and flip over. This will cover your fabric and mesh so you have a finished look to the back of your bow holder.Step Seven:
Glue mesh and any fabric that may be loose under the picture insert. This will give the back of your bow holder a finished look.Step Eight:
Place backing into frame and secure fasteners to keep bow cardboard insert into place.Step Nine:
Using your ribbon, tie knots onto the fasteners on picture frame. This will be what holds your bow holder onto the wall.Step Ten:
Secure a bow in the middle of the ribbon. This will give your bow holder a little more pizazz and hide the nail that you hang it from. Viola! Your bow holder is completed! Breath a sigh of relief and give yourself a big pat on the back....now go and hang your finished bow holder in your little girls room and clip her collection of bows to it. So cute! Enjoy!!

I

Ashlee, The Culinary Queen

Thursday, April 29, 2010

Mothers Day Craft Tutorial

A couple of days ago, I was invited to a friends home to make these darling crafts for Mother's and Father's day! It was nice to get a jump start on gifts for these holidays because it is so hard for me to think of things to give these special people in my life. Especially, those that seem to already have everything they want/need. I loved this craft idea. It is very simple to make and only took me several hours to complete. I made these for my hubby, my mom and my mother in law for their special days. I thought they could place these on their desks at work to help remind them of our little family.

Tutorial
Step 1: Using a 2x4 cut 2- 12 inch pieces of wood. Sand edges and all over wood to make smooth to the touch.
Step 2: Stain wood to the color of your liking or if you don't have stain on hand you can use Acrylic paint and water it down a little. Let Dry.
Step 3: Using modge podge, paint the wide flat side and place a 3 inch x 12 inch piece of your choice of scrapbook paper onto the wood. Modge Podge to secure paper. Once secure, Modge Podge over the entire paper to secure.
Step 4: Using modge podge again, paint the thin side of 2x4. Then adhere a 1 inch x 12 inch piece of your choice scrapbook paper onto the wood. Modge Podge on back of scrapbook paper to secure paper to wood. Once secured, modge podge over the entire paper to secure.
Step 5: Once Modge podge is dry, drill three holes at the top of your widest piece of wood at 2 inch, 6 inch and 10 inches. Make sure you drill all the way through!!
Step 6: Pull ribbon through the holes and attach a cute clamp of your choice. Tie a bow. Add a picture.
Step 7: On your thin piece of scrapbook paper, rub on your choice of saying printed in Vinyl Lettering. Some sayings that you could use: Best Friends Forever, We love Grandma, We love Daddy, We love You!
Step 8: Secure the two piece of wood together by using Elmers Wood Glue or Elmers white glue.
Step 9: Viola, you have a cute gift to give away.

I

Ashlee, The Culinary Queen

Related Posts Plugin for WordPress, Blogger...