Thursday, October 28, 2010

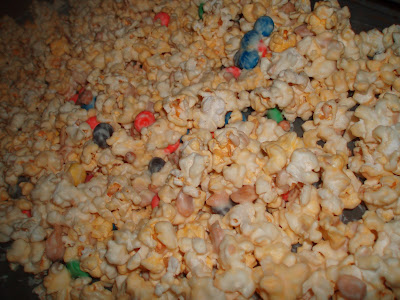
White Chocolate Popcorn

I made this recipe with my little boy last night. He loves to help his mom in the kitchen. I also really enjoy having him by my side. It is fun to have some mother son bounding time! I wanted to give this recipe a try and thought it would be a wonderful recipe to
get my little boy in the kitchen, but also to satisfy my craving for something sweet! I love that this recipe calls for ingredients that you have on hand in your pantry: popcorn, shortening and two bags of white chocolate chips. The only other additional ingredients that you may have to pick up are peanuts and m&m's. This recipe is an easy one to make. It takes a total of 45 minutes from start to finish before you can start enjoy this yummy popcorn but it is worth the wait!! This recipe is a wonderful one to make for a party, or to surprise a neighbor.

White Chocolate Popcorn
adapted from the kitchen of "Jamie cooks it up!"

Ingredients:
2 bags of Microwave Popcorn
2 bags of White Chocolate Chips
1 T. Shortening
1 c. M&M's
1 c. Nuts, (peanuts, cashews work great too!)

Directions:
Pop your popcorn according to package directions. Put your white chocolate in a microwave safe bowl. Heat for 30 seconds and stir until melted. Make sure you heat chocolate in 30 second increments, you dont want to take the chance and burn your chocolate.Once your chocolate is melted, add shortening and mix with chocolate until it melts in with chocolate.
Place your popcorn in a really large bowl, pour warmed chocolate over popcorn. Stir until popcorn is coated with the chocolate. Add your m&m's and nuts and stir until well combined. Spread coated popcorn onto 2 cookie sheets lined with wax paper. spread evenly. Let cool for 30 minutes or until set. After 30 minutes, break into pieces and enjoy or package up in cute packages and surprise a friend or neighbor with a sweet treat!

I

Ashlee, The Culinary Queen

Wednesday, October 27, 2010

Orange Chicken with Vegetable Stir Fry

I don't know about any of you but since the holiday season has begun, I have indulged a little too much in Halloween candy. I made this recipe last night for my family to help off set the holiday sweets that I have eaten and hopefully keep the chub on my thighs at bay. This recipe is a wonderful one to add to your cookbook especially when you have indulged like I have and want to put something good into your body instead of junk. I love that this recipe uses several vegetables: carrots, red onions, celery, green peppers, and red peppers. The vegetables combined with chicken is a wonderful combination when mixed with the savory orange sauce served over brown rice. I have to admit too, that their is no fighting at my dinner table when I serve this dish because my kids can't get enough of this Orange chicken. What is even better is that it made so much that my little family of four will be eating it again tonight as left overs!! Hurray for leftovers!

Orange Chicken with Vegetable Stir Fry
Ingredients:
4 chicken breasts
3/4 c. flour
1/4 tsp. Salt
2 TBS Olive Oil
5 large carrots
1 onion, I used a red onion and loved it
2 bell peppers, your choice between green, yellow or red.
6 stalks of celery
Salt and Pepper

Sauce:
3/4 c. Fresh Orange Juice
1/2 c. Brown Sugar
1/4 c. Soy Sauce
1/2 tsp. ginger
2 t. rice vinegar
1/2 tsp. sesame oil
A couple pinch of red pepper flakes
2 TBS. Cornstarch
1 c. chicken broth

Directions:
Cut chicken breasts into 2 inch cubes. Combine the flour and 1/4 tsp salt into a bowl. Add chicken and combine until all the chicken is covered in the flour mixture. Heat up a large skillet. When skillet is nice and hot add 2 T. oil and then add chicken. Stir fry until chicken is cooked through and lightly brown. When your chicken is cooked through and lightly brown. Remove from skillet onto plate. Now add another 1T. of oil to skillet, add your veggies and cook until tender crisp about 10 minutes. While veggies are cooking, add all ingredients for the sauce in a sauce pan. Whisk ingredients together until they are well combined. Bring to a boil. Once it is boiling it will thicken up for you, it may take between 5-10 minutes for it to do this. Stir every so often so it won't burn. Once sauce is nice and thick pour it over your veggies and chicken. Combine until sauce coats both chicken and vegetables. Serve with white or brown rice!

I

Ashlee, The Culinary Queen

Pumpkin Chocolate Chip Pancakes

Tis' the season for the yummy flavor of pumpkin. I love all recipes at this time of year that include this glorious ingredient. I also think my husband has a secret love affair with this ingredient because whenever I present him with something made with pumpkin, he gets stars in his eyes and he tends to drool just a little...don't let him know that I know. Wink, Wink. I recently came across this super yummy recipe for Pumpkin Pancakes. While making these pretty pancakes at my house, the wonderful aromas of pumpkin, cinnamon, nutmeg and cloves filled my home. I also added miniature chocolate chips to the mix to entice my little ones to the table. This recipe was a huge hit with both my two kidlets and my big kid (love you honey). This would be a wonderful recipe to make for Thanksgiving or Christmas Mornings! Enjoy!

Pumpkin Chocolate Chip Pancakes

Ingredients:
11/4 c. flour
2 T. Sugar
2 tsp. baking powder
1/2 tsp. cinnamon
1/2 tsp. ground ginger
1/2 tsp. salt
1/8 tsp. nutmeg
A pinch of ground cloves
1 c. Milk
1/4 c. plus 2 T. pumpkin puree
2 T. melted butter
1 egg
1/4 c. mini chocolate chips

Directions:
Place all dry ingredients into a bowl and mix until well combined. Mix wet ingredients together and then add to dry ingredients. Mix together until well combined. Don't over mix because over mixed batter won't puff up nicely. Fold in Chocolate Chips. Pour the batter on griddle 1/4 c. at a time. Cook until the bubbles stop popping. About 2 minutes. Flip over and continue to cook other side for another 2 minutes. Serve with maple syrup and whipped cream.

I

Ashlee, The Culinary Queen

Sunday, October 24, 2010

Savory Sweet Potato Fries

These sweet potato fries are sure to be a hit with your youngsters. My two cute kidlets can't get enough of these. I also don't feel so bad feeding these fries to them because they are baked and not fried. These fries are lightly coated with olive oil and then are lightly coated with two different seasonings. This is definitely a side dish you don't have to feel guilty about serving to your family!!! These fries go great with steaks, burgers, sandwiches or even a side dish for a special occasion such as Thanks giving!! These would also be a yummy after school snack!

Savory Sweet Potato Fries
recipe from "Jamie cooks it Up!"
Ingredients:
5 small yams ( sweet potatoes are whitish in color on the inside you want the lovely yellow colored yams for this recipe.)
3 T. Olive oil, or extra virgin
2 t. Montreal Steak Seasoning
1 t. Johnny's Seasoning Salt

Directions:
Peel your yams, and cut them into nice thin slices. Not too thin or thick. Just eyeball it. You want them uniform so they will all cook evenly. Place into a bowl and Drizzle with olive oil and coat with seasonings. Toss with your hands until all pieces of yams are coated with seasonings and olive oil. Place fries on two greased cookie sheets. Fries should not touch.. this will help all fries to bake evenly. Place cookie sheets in oven and Bake in a 400 degree oven for 8 minutes. After those 8 minutes are up take cookie sheets from oven and turn fries over with spatula and place back into oven for and additional 8 minutes. This helps the fries to cook evenly.

Dipping Sauce:
1/3 c. Miracle Whip
1/3 c. Sweet Baby Ray's BBQ Sauce (this is my favorite BBQ Sauce- you won't be disappointed in using this even if it is a little more pricey at the grocery store)
Mix until well combined. Refrigerate until ready to use. Serve with Sweet Potato Fries.

I

Ashlee, The Culinary Queen

French Dip Sandwiches

I have been doing quite a bit of cooking lately and have thoroughly found some new delicious recipes from a darling blog called, "Jamie cooks it Up!" I love her cooking blog and if you check her out here you just might fall in love with her blog as well! Tonight for Sunday dinner, I tried her french dip sandwiches. I loved this recipe right off the bat because it is a slow cooker recipe. I HEART slow cooker recipes!! Especially, in the winter time. There is nothing better to me than cooking with your slow cooker and letting the aromas waft through the air. Nothing says fall and winter time than this. This recipe hit the spot with my little family of four this evening. Even my cute little 5 and 2 year old didn't complain! That is right, no fights with them at all over getting them to eat their dinner. What mother doesn't like dinner time to be peaceful? I know I do! This recipe would be perfect to serve on Halloween Evening before the troops vacate your home to do a little Happy Haunting. I served my Meat topped with provolone cheese and served on crusty rolls. I paired these delicious sandwiches with a subtle yet savory sweet potato fries recipe, yes you guessed it... courtesy of Jamie.

French Dip Sandwiches
recipe courtesy of "Jamie cooks it Up!"

Ingredients:
1 3-4 lb. beef roast
1 T olive oil
salt and pepper
2 -1 oz pkgs. Lipton Onion soup mix
4 c. Hot Water
2 Beef Boulion
8 rolls, something with a good crust on it
Cheese, I recommend Provolone

Directions:
Heat up skillet, add olive oil. Sprinkle your roast with salt and pepper, generously!! Place roast in the pan and sear meat on all sides. Place meat in slow cooker. Sprinkle onion soup mixes over roast and add hot water and Beef Boulion cubes. Cover and cook on HIGH for 6-8 hours. One hour before serving, take out beef and shred. Return beef to crock pot and simmer in juices for 1 more hour. When ready to serve, take meat out of crock pot and serve on rolls with your choice of cheese. Pour hot juices from crock pot into tiny bowls for dipping your sandwiches in. Enjoy!!

I

Ashlee, The Culinary Queen

Apple Wheat Pancakes

Ok, so I had to share another breakfast dish with my small following of cooking fanatics! This recipe comes from cooking blog Jamie Cooks it up! I am always looking for ways to implement my food storage into my cooking. This recipe uses both wheat and white flour. I am quite fond of this because this is an excellent recipe to help get your kids used to eating wheat!! I am all for that and who isn't all for eating better too! I tried this recipe last weekend on my little family of four and they freaked out because it was so good. I seriously thought I heard them moaning because it was so good! Oh wait, I think that it was me! I loved these pancakes and the butter cream syrup is to DIE for. I actually had left over syrup and used it to dip granny smith apples in the next day for a afternoon snack and it was fabulous! Just a warning, the pancakes are some what healthy but by adding the syrup, any nutritional value may go out the window! I just wanted to throw this little factoid out there in case any of you were thinking that I was proclaiming that this is a healthy option for breakfast. Although, I will guarantee that when you make this recipe for your family that you will earn the culinary cooking queen award!! This pancake and syrup recipe would be a great dish to make for all that Holiday company you many have coming in the next few months. It is sure to please your guests because of its irresistible holiday spices like cinnamon, nutmeg and apple!!

Apple Wheat Pancakes with Butter Cream Syrup
recipe and photo courtesy of " Jamie cooks it Up!"

Ingredients:
6 T. dry powdered milk
1 1/2 c. water
1/2 c. apple sauce
1 T. Lemon Juice
2 eggs
1 apple, cored and grated
4 T. oil
2 T. Sugar
2 t. Baking powder
1 c. white flour
1 c. wheat flour
2 t. cinnamon
1/2 t. nutmeg
3/4 t. salt
3/4 t. Baking soda

Directions:
Beat all ingredients until smooth. If the batter is thick add a bit more water or milk. If batter is too thin, add a bit more flour. Heat skillet or griddle pan and spray with cooking spray. Pour batter into 1/4 c. increments or to your liking. Cook until batter stops bubbling. Flip and cook on the other side. Serve with Butter Cream Syrup.

Butter Cream Syrup
recipe and photos courtesy of "Jamie cooks it Up!"
Ingredients:
1/2 c. butter
1 c. sugar
1/2 -3/4 can of evaporated milk
1 tsp. vanilla

Directions:
Melt butter in small saucepan over medium heat. Add sugar slowly and stir until creamy, thick and smooth. Add the milk a little at a time while stirring. Add vanilla and let it simmer for 5-10 minutes longer. I simmered mine for about 15 because of my glass top electric stove. Syrup will have a thick consistency when it is cooked long enough.

I

Ashlee, The Culinary Queen

Baked Oatmeal with Berries

I found this recipe on a fellow food lover's blog! The author of the blog is in one of my friends church boundaries. I think that we might be kindred spirits even though I have never met her. I have tried a few of her recipes now, and I think I am in love... maybe a little with her(mostly her blog) since she is a brilliant chef for sharing her recipes on line but because I know that she is also in love with trying new recipes and is a little bit of a fanatic when it comes to food like I am. When I saw this recipe I just had to try it. Both of my little kidlets love oatmeal and they eat it frequently for breakfast! The thing that I hate though is spending the money for those individual packets of oatmeal when I have a whole food storage of oatmeal waiting to be used and know that I am quite capable of making oatmeal with out the help of Mr. Quaker Oat man. This recipe is a wonderful one for using that food storage that you may have. This baked oatmeal recipe is like eating warm oatmeal cookies for breakfast or even better a pie! My husband and I added a thawed berry mix to our servings and we thought we had died and gone to heaven...it tasted like a berry pie! The BEST part is that you know that even though it is sweet like dessert you know that you are eating healthy!! Give this oatmeal recipe a try next time you have a hankering for adding something new to your breakfast menu!

Baked Oatmeal with Berries
photo and recipe courtesy of cooking blog: "Jamie Cooks it Up!"

1 1/2 c. quick cooking oatmeal ( you can use regular if you would like)
1/2 c. sugar
1/2 c. milk
1/4 c. butter
1 egg
1 t. baking powder
3/4 tsp. salt
1 1/2 t. vanilla

Additional Ingredients:
Milk
Berries, frozen or fresh ( if you are using frozen thaw in microwave before adding to oatmeal)
Brown Sugar

Directions:
Mix first 8 ingredients together and spread batter into into a greased cookie sheet. Bake in a 350 degree oven for 25-30 minutes or until golden brown. Serve with berries, milk and brown sugar if desired.

I

Ashlee, The Culinary Queen

Related Posts Plugin for WordPress, Blogger...