Monday, January 31, 2011

Sweetheart Cookies

I can not believe that tomorrow is February! Where did January go? Personally, I am glad that January is over because it truly is a boring and dreary month, that leaves even the most outgoing of people shut ins and a little on the unpleasant side, me included. January is one month that I don't feel warm and fuzzy about.
However, one month that I do feel warm and fuzzy about is February. There are so many things that I love about February.
I LOVE the bright red, purple, and pink hearts that seem to pop up in window store fronts. I LOVE that the weather perks up a little giving me hope that the warm spring weather will soon emerge from it's winters nap. I also LOVE showing the dear ones in my life how much I appreciate them. One way that I like to show the special people in my life how much I love them, is baking up some yummy goodies to share with them. It has been said that a way to a man's (or anyones heart for that matter) is through their stomachs. For me personally, I am happier when I have good food to eat and look forward to! With Valentine's Day just around the corner, this cookie recipe is a wonderful one to share with your special "sweetheart(s)." These buttery, flaky cookies have raspberry or strawberry jam centers and are lightly dusted with powdered sugar, which makes them irresistible. From past experience, plan on doubling this recipe because your cherubs will fall in LOVE with these little gems and they will be gone in a heart beat!

Sweetheart Cookies
recipe adapted from the kitchen of Taste of Home

Ingredients:
3/4 c. butter, softened (do not use margarine)
1/2 c. sugar
1 egg yolk
11/2 c. flour
Raspberry or Strawberry Jam or Preserves
Powdered Sugar

Directions:
In a large mixing bowl, cream the butter and sugar. Add egg yolk and mix well. Stir in flour by hand. On a lightly flour surface, gently knead the dough for 2-3 minutes or until thoroughly combined. Roll into 1 inch balls. Place 2 inches a part on a greased baking sheet. Using the end of a wooden or plastic spoon handle, make an indention in the center or each. Fill each wth 1/4 t. preserves. Bake at 350 degrees for 13-15 minutes or until edges are lightly browned. Remove cookies to wire rack and dust warm cookies with powdered sugar. Cool completely. Makes about 2 Dozen cookies.

I

Ashlee, The Culinary Queen

Tuesday, January 25, 2011

Chicken Pesto French Bread Pizza

I love simple and easy dinner recipes! Well, let me tell you, this recipe is easy. and. simple. I was a little hesitant to make this pizza recipe for my family or should I say (kids) because I was afraid that they (kids) wouldn't touch it especially since the pesto is green! Anything that even resembles a Green veggie triggers initial panic and a state of distress at our home. FEAR NOT, for I have found a recipe that the kidlets ate! *Cue angels singing*
In fact there were very. clean. plates. the night that I made this.

This recipe starts out with a regular french bread baguette and is topped with a pre-made pesto sauce, grilled/sauted chicken, mushrooms, onions and grated mozzarella and Parmesan cheese. This recipe took me a total of 30 minutes to prepare and serve to my ravenous family! This is definitely a perfect recipe to serve to the troops on a busy weeknights!

Chicken Pesto French Bread Pizza
Ingredients:
1 Loaf of French Bread
2 T. olive oil
2 chicken breasts
salt and pepper
11/2 t. garlic, minced
1 Large white onion, halved and then sliced
1 small jar of pesto ( I found mine at Walmart near the spaghetti sauce)
1/2 c. fresh mushrooms, sliced
2 c. Mozzarella cheese, grated
1 c. Parmesan cheese, shredded

Directions:
1. Cut your chicken into bite sized pieces using kitchen shears or a knife. Heat a large skillet with 1 tbsp. olive oil. When olive oil and pan are nice add your garlic and chicken. Season with salt and pepper and saute until chicken and garlic are nice and golden brown. When you have achieved this. Remove from pan and set aside for later.

2. In the same skillet, add another tbsp. olive oil and add your onions and fresh mushrooms. Saute until onions are golden brown and mushrooms are cooked.

3. Cut your French bread length wise (not into pieces) or right through the middle giving you two halves to put your toppings on!

4. Spread your pesto sauce on each slice of French bread. Layer chicken, onions, mushrooms over the top of the pesto and then sprinkle your cheeses over the top.

5. Cook in a 400 degree oven until cheese is nice and bubbly and until the bread is heated through. Slice into pieces and serve! Enjoy!

I

Ashlee, The Culinary Queen

Cookies and Cream Dream Cupcakes


Last week I had a really bad day... actually I had a few bad days in a row!! Then out of the blue one of my DEAR FRIENDS and neighbors, stopped by for a surprise visit! Unbeknown to her, she didn't know I had had a bad fews days but her visit totally brightened my day! Don't you just love friends who seem to get a sense to drop by and see you? I do! Well she is that kind of friend! When she stopped by, she brought this with her for yours truly:


Anyone that knows me knows that I have a small obsession with Gourmet Cupcakes. My sweet friend saw this calendar and just knew that I should have it! It was so nice to be thought of and what was even more special was knowing that my friend truly knows one of my passions and indulges me!

I am in love with this calendar! Each month a new flavored cupcake recipe is featured! I can't wait to try them all! It will give me something to look forward to making each month as a special treat... and you better believe that I will be dropping off these monthly creations to my sweet friend! Love you DG Darling and thanks for thinking of me!

January's Themed cupcake is Cookies and Cream Dream. Oreos are one of my favorite store bought cookies. I could eat the whole bag if I am not careful. I know I have no shame! *blush* This simple yet delectable recipes is sure to be a hit at your home. I know that after I made and frosted these little gems I had to hide a few for a church function that I planned on taking them to because my husband and kidlets kept sneaking them from off the counter!

The cupcake batter is simple to make and uses a store bought cake mix for convenience and ease. The frosting is very simple to make and is so yummy with crushed oreos!
Make some tonight and indulge that sweet tooth!

Cookies and Cream Dream Cupcakes
Ingredients:
1 box of chocolate cake mix
1 c. sour cream
3 eggs
1 tsp vanilla
18-24 whole chocolate sandwich cookies (Oreos)
12 chocolate sandwich cookies, crumbled

Directions:
Mix together cake mix, sour cream, eggs, and vanilla. Place a spoonful of batter on the bottom of each paper liner. Place a whole cookie on the bottom lying flat. Cover with another scoop of batter until 3/4 full.

Bake at 350 degrees for 15-18 minutes. Allow cupcakes to cool on a rack completely.

Vanilla Buttercream Frosting
8 Tbsp. (1 stick) butter, room temperature
3 3/4 cups, powdered sugar, sifted
3-4 Tbsp. milk or cream
2 tsp. vanilla extract

Place butter in a large mixing bowl. Beat until light and fluffy, about 30 seconds. Stop beating before adding sugar to avoid a large mess.

Add sugar, milk or cream, and vanilla. Beat frosting starting on slow speed, increasing your speed until frosting is nice and creamy. Add 1-2 Tbsp. milk or cream if frosting is too thick. Add Crushed oreos and fold in.

Add crumbled cookies to Butter cream Frosting. Be generous and frost cupcakes nice and high. Top with a Chocolate Cookie for a pretty presentation! Indulge that sweet tooth and enjoy!


I

Ashlee, The Culinary Queen

Monday, January 17, 2011

Broiled Tilapia Oreganata


Today for my Meal time Monday feature, I have a really yummy Tilapia recipe for you all. Adding fish into your meal time menu routine twice a week has some GREAT BENEFITS! With all the great benefits from eating fish, I have been searching for some great fish recipes to insert into my monthly meal rotation. Tilapia is my family's favorite fish to eat because of its mild flavor. It rarely is fishy! With that said, Broiled Tilapia Oreganata has become one of my favorite ways to make fish. This recipe is easy to make and can be on the table in less than 30 minutes. This recipe is also very flavorful and the breadcrumbs give a nice crunch to the fish. Pair it up with rice, steamed veggies or baked zucchini sticks for a complete and delicious meal!

Broiled Tilapia Oreganata
Ingredients:
1 Tbsp. finely chopped fresh oregano or tsp. dried oregano
4 (5 oz.) Tilapia fillets
1/2 tsp. salt
1/4 tsp. black pepper
4 tsp. olive oil
1 garlic clove, minced
2 Tbsp. Whole Wheat seasoned breadcrumbs

Directions:

Preheat broiler. Line baking sheet with alluminum foil. Rinse Tilapia. Pat fillets dry with paper towls. Season with salt, pepper, and oregano. Add garlic, and drizzle with olive oil. Sprinkle breadcrumbs on top. Arrange fillets in a single layer on the prepared pan. Broil 8 inches from the heat until the topping is browned. Be careful not to over cook the fish and burn it. KEEP AN EYE ON IT. Serve with a slice of lime and your favorite veggies.

I

Ashlee, The Culinary Queen

Baked Zucchini Sticks with Marinara


As a family we have been trying to eat a little better and with that I have switched over to baking everything instead of frying everything in oil and butter. I have to honestly tell you that I have truly felt better since making this little change. I have more energy and can tell a difference in my whole well being. I recently came across this recipe on line and it is a huge hit at our home. I love French fries and this is the next best thing...Baked Zucchini sticks with Marinara Dipping sauce. These are guiltlessly delicious! My kids love them because they get to dip and dunk them. I love them because they are a perfect snack or even an impressive side dish! Plus as an added bonus the kids don't realize they are getting a helping of veggies! What mom doesn't love that?

Baked Zucchini Sticks with Marinara Dipping Sauce

Ingredients:
3 medium zucchini, sliced and cut into 3"X 1/2" sticks
1 Large Egg White
1/3 c. whole wheat seasoned breadcrumbs
2 tsp. Romano or Parmesean cheese, grated
cooking spray
1/4 tsp garlic powder
salt
Fresh pepper

Quick Marinara Sauce
Ingredients:
1 tsp. olive oil
2 garlic cloves, smashed
28 oz. can Crushed Tomatoes
1 small bay leaf
1 tsp oregano
2 Tbsp. chopped fresh basil or 1 tsp. dried basil
salt and pepper to taste

Preheat oven to 425 degrees.

In a medium pot, heat olive oil over medium heat. Add garlic and saute until golden, being careful not to burn. Add crushed tomatoes, salt, pepper, oregano, basil and bay leaf. Stir and reduce heat to love. Cover and let simmer for 20 minutes.

In a small bowl, beat egg white and season with salt and pepper. In a ziplock bag, place breadcrumbs, garlic powder and cheese and shake well. Spray cookie sheet with cooking spray and set aside.
Dip zucchini sticks into eggs then into bread crumbs and cheese mixture a few at a time and shake to coat.
Place the breaded zucchini in a single layer and spary more cooking spray on top. Bake at 425 for about 20-25 minutes, or until golden brown. Serve with 1/2 c. marinara sauce for dipping!

I

Ashlee, The Culinary Queen

Sunday, January 16, 2011

Best Ever Banana Nut Mini-Muffins

The name says it all! These truly are the Best Ever Banana Nut Muffins you will ever taste. These delightful little morsels are sure to become a favorite in your home. I took this recipe and tailored it to my little family. Everything is cuter and seems to taste a little better when it is "mini." These bite-sized muffins are perfect for little ones because they can be held in just the palm of your hand- perfect for little hands. Instead of large chocolate chips, I used "mini" for just a bit of sweetness and chopped pecans for a little bit of crunch. If you have nut allergies in your home, these can easily be left out. These muffins are perfect for a special weekend breakfast or even for an after school snack!

Best Ever Banana Nut Mini Muffins
recipe adapted from howdoesshe.com
Ingredients:
4 medium mashed bananas
3 T. oil
1 Large Egg
1/3 c. sugar
2 c. Bisquick baking mix
1/4 c. chopped nuts, optional
1/4 c. mini chocolate chips

Directions:
1. Heat oven to 400 degrees and Grease 24 mini muffin pan with cooking spray.
2. Beat bananas, oil, large egg, and sugar in a large bowl until well blended. Stir in baking mix, nuts and mini chocolate chips just until baking mix is moistened (batter will be lumpy). Divide batter into mini muffin tin.
3. Bake for 10-15 minutes or until or until golden brown. Cool muffins in pan for 5 minutes. Remove from pan onto a wire rack. Serve warm.

I

Ashlee, The Culinary Queen

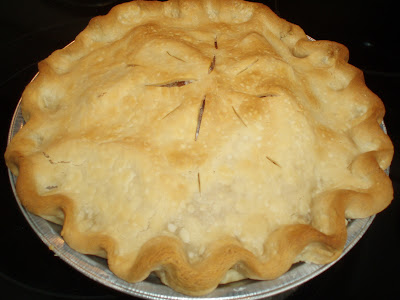
Glazed Apple Cream Pie

I have been a little busy this week and failed to post on Friday because this little guy celebrated his 6th birthday! So please for give my absent self.


In our family it is a tradition to let the birthday boy or girl choose their favorite meal and dessert for their special birthday dinner. This year, my little guy requested my husbands Curry (potatoes, carrots, chicken and onions in a spicy savory gravy which is served over rice). He also requested Apple Pie for his dessert. I wanted to try out a new Apple pie recipe for the occasion. I have definitely found a new twist on an old favorite and just had to share this recipe with you all!

This apple pie has a creamy pudding-like custard mixture which lays at the bottom of the pie. It is then topped with a cinnamon sugar apple mixture and is all baked into a delicious pie crust and then topped with a sugar glaze! This recipe is very easy to make and you can use a refrigerated pie crust from the store to save on time. This pie would be great dessert to make for Thanksgiving Day dinner or a dinner party! Your guests will surely be impressed with this twist on an old American favorite.

Glazed Apple Cream Pie
Ingredients:
1/2 c. white sugar
1/2 c. milk
1/2 c. heavy cream
1/4 c. butter
2 T. cornstarch
2 T. milk
1 t. Vanilla Extract
3 tart apples, sliced and skin removed(I like to use Granny Smith)
1 T. all-purpose flour
1/4 t. Ground Cinnamon
1 (15 ounce) package pastry pie crust for double crust pie (Pilsbury is my favorite)
1/2 c. Confectioners Sugar (Powdered)
1 T. Milk
1/4 t. Vanilla Extract
1 T. Butter

Directions:
1. In a medium saucepan over medium heat, combine 1/2 c. sugar, 1/2 c. milk, 1/2 c. heavy whipping cream, 1/4 c. butter. Heat until butter is melted, stirring occaisonally. In a small bowl, whisk together cornstarch, 2 T. milk, and vanilla; stir into the saucepan. Cook until thickened, stirring constantly. Remove from heat and set aside to cool slightly.
2. Preheat oven to 400 degrees. In a medium bowl, combine sliced apples, flour, and cinnamon. Mix well.
3. Line a 9 inch pie plate with pie dough. Pour thickened mixture into pastry lined pie pan. Arrange apple mixture on top evenly. Top with second crust, seal and flute the edges. Cut slits in the top crust.
4. Bake for 30-40 minutes, or until crust is golden brown and apples are tender. Cool at least 30 minutes.
5. In a small bowl combine, powdered sugar, 1 T. milk, 1/4 teas. vanilla, and 1 T. butter. Blend until smooth; pour evenly over warm pie. Refrigerate for at least 1 1/2 hours before serving. Longer is better. Refrigeration is crucial for the cream to set up in pie! Enjoy!

I

Ashlee, The Culinary Queen

Tuesday, January 11, 2011

Pumpkin Banana Bread

Homemade Banana bread is my favorite quick bread to make. It makes for a great afternoon snack or for breakfast. I love my bread slathered in butter and served with a tall glass of ice cold milk. *awww.... heaven* This past week, I have been thinking of ways that I could utilize some ripe bananas and left over pumpkin puree. This recipe was the ticket to using both! I love Pumpkin bread and Banana Bread but never thought to combine them. This recipe is also a healthier option than the traditional pumpkin or banana bread with ingredients like whole wheat flour and brown sugar. It also has the feeling of fall with its seasonal spices like cloves, cinnamon and nutmeg! This recipe is sure to become a favorite at your home.

Pumpkin Banana Bread
Ingredients:
Pam Baking Spray
3/4 c. unbleached all purpose flour
1/2 c. white whole wheat flour
3/4 tsp. baking soda
1/2 tsp. salt
1 tsp. cinnamon
1/2 tsp. cloves*
1/2 tsp. nutmeg*
3 very ripe bananas, mashed
1/2 c. pumpkin puree
2 Tbsp. butter, softened
1/2 c. Light brown sugar, unpacked
1 Large egg
1 Large egg white
1 tsp Vanilla extract
1/4 c. pecans, chopped

* If you do not have cloves or nutmeg on hand you can use 1 tsp. Pumpkin Pie Spice in place of the cloves and nutmeg

Directions:
Preheat oven to 325 degrees. Grease a 9X5 pan with baking spray.
In a Medium bowl combine flour, baking soda, spices and salt with a wire whisk and set aside.

In a Large bowl, cream butter and sugar together with an electric mixer. Add egg white, egg, bananas, pumpkin and vanilla, and beat on medium speed until thick. Scrape down sides of the bowl. Add Flour mixture and nuts and blend on low speed until well combined. Don't over mix!

Pour batter into pan and bake on the center rack for 60 minutes, or until when toothpick inserted comes out clean.

Let Pan cool for 20 minutes, bread should be at room temperature before slicing.

I

Ashlee, The Culinary Queen

Monday, January 10, 2011

Skinny Garlic Mashed Potatoes


There is no need to give up your favorite comfort foods when trying to cut calories and eat better!! These Skinny Garlic Mashed Potatoes are sure to hit the spot when you make this "lightened" up recipe using low fat ingredients, garlic and fresh herbs.

Skinny Garlic Mashed Potatoes

Ingredients:
Servings: 5 Servings - Size: 3/4 cup- Calories: 160

2 lbs. ( 4 medium) Yukon Gold Potatoes, peeled and cubed
4 garlic cloves, peeled and halved
1/4 c. fat free sour cream
1/4 c. Chicken broth
2 T. skim milk
1 Tbsp. Light Butter
salt to taste
dash of fresh pepper
1/4 c. herbs of your choice: parsley, thyme, or tarragon

Directions:
Put potatoes and garlic in a large pot with salt and enough water to cover. Bring to a boil. Cover and reduce heat. Simmer for 20 minutes or until potatoes are tender. Drain and return potatoes and garlic to pan. Add sour cream and remaining ingredients. Using a masher, mash until Smooth. Season with Salt and Pepper to taste.

I

Ashlee, The Culinary Queen

Petite Turkey Meatloaves


Lately, I have been a little absent from blogging because I have been hard at work in search of healthy new recipes to go along with my new year's resolution of eating a little better and making time to exercise for 45 minutes a day. For any of you that are full time moms and have kids, you know that being a mom takes a lot of time and effort and sometimes it requires you to put yourself last during the day. For one of my New Year Resolutions, I decided that I didn't want my health to take a back seat (my health has been taking a back seat) anymore. Besides if I am not healthy and feeling well, then I am not going to be the best mom I can be to my two kids. Being a good mom to my kids is very important to me! With that I have found some new recipes that I can't wait to share with you and your families. Looking for good nutritious recipes to feed your family with takes time and effort and sometimes it can be daunting trying to find them. I want to take out the work for all of you!

I have found a great recipe for today's MEAL TIME MONDAY FEATURE:
Petite Turkey Meatloaves!

I came across this recipe for Turkey Meatloaves. These individual meatloaves are kid friendly and cook faster than making one big loaf. I made the switch from ground beef to ground turkey months ago and actually prefer turkey over beef any day. Don't be scared to try ground turkey. It is very moist in any recipe and provides great flavor! I also replaced breadcrumbs with cholesterol lowering oatmeal for added nutrition. Serve this with Skinny Garlic Mashed Potatoes and a fresh veggie and you have a complete and healthy dinner for your family.

Petite Turkey Meatloaves
Ingredients:
Servings: 4 individual loafs
Calories: 221

1/2 onion, minced
1 tsp olive oil
1.3 lbs Ground Turkey
1/2 c. Oatmeal
1/4 c. Ketchup + 2 Tbsp.
2 tsp. Worcestershire sauce
1 Large Egg
1 tsp. Marjoram

Directions:

Preheat oven to 350 degrees. Saute olive oil and onion on low until translucent.
In a Medium Bowl, mix turkey, onion, oatmeal, egg, ketchup, salt and marjoram. Divide into four equal loaves and place each loaf into a non stick mini loaf pan or shape into small loafs on an un-greased non-stick baking pan.

In a Small cup mix remaining 2 Tbsp. with Worcestershire sauce and brush onto each loaf to give a nice glaze.

Bake uncovered for about 4o minutes at 350 degrees. After baking let loaves sit for 5 minutes before serving.

I

Ashlee, The Culinary Queen

Friday, January 7, 2011

Winner of "Sew Into Quilts" Giveaway

**Congratulations to...**

Dazeeb said:
"I am a follower of your amazing blog, which has given me MANY great ideas for dinner and baking! I am also following Sew Into Quilts and like you on facebook!"

Congratulations Dazeeb (Bobbie)! Please contact me to claim your prize!

theculinaryqueenbee@gmail.com

A special thank you again to Shauna from Sew Into Quilts for Sponsoring this giveaway for me! To my Culinary Queen Bee readers, please Check back soon for more fun giveaways!

I

Ashlee, The Culinary Queen

Thursday, January 6, 2011

Last Chance...

Hi CQB Readers! I just wanted to remind you all that today is the last chance/day to enter the "Sew Into Quilts" Giveaway! Click here to go and enter the giveaway! I will be drawing and announcing a winner tomorrow morning! So stay tuned and GOOD LUCK!

I

Ashlee, The Culinary Queen

Tuesday, January 4, 2011

Kitchen Tip Tuesday- Emergency Ingredient Substitutions


I am excited for todays KITCHEN TIP TUESDAY Feature! I have a helpful tip and a delicious recipe that go hand in hand with each other! Are you excited? I knew you would be!

I don't know about any of you food lovers/chefs but one of my biggest pet peeves is when I am in the middle of following/making a recipe, only to find out that the ingredient I need is either used up or I don't have enough of it to make the dish I am working on! Having to leave the kitchen, hop in the car and drive to the grocery store to fetch the item can be really obnoxious. I know planning and having the ingredients on hand is necessary to having a good outcome to any excellent dish but sometimes it is inevitable to have all the ingredients you need on hand all the time. Todays helpful hint is an emergency substitution that I learned back in College when I was taking a cooking course!! It will also save you money!! * squeal* Who isn't about saving money and making due with the ingredients you have on hand? Call me cheap but I love saving money!!

A good friend and neighbor of mine has an excellent Buttermilk Pancake Recipe that she shared with me a year or so back. I frequently make her pancake recipe for my kids on the weekends because it is quick, and easy and fills their tummies right up! I also make them because my kids love pancakes, and so does their mom! Sshhh! Dont' tell! The only draw back to this recipe is that it calls for Buttermilk. I rarely use buttermilk and I hate buying it only to use a little and have the rest of it spoil. So what is the solution? I will let you in on one of the Queen's little secrets!

Are you ready? :)

You can make your own buttermilk with two ingredients that you probably have on hand!!! Pretty cool eh?

Emergency Substitution:
For every 1 c. of buttermilk you need, you can use: 1 cup of milk plus 1 T. Lemon Juice.

What I do so I don't dirty unecessary bowls (see I really do look for ways to save money and cut corners) is take my one cup measuring cup and add the 1 T. Lemon juice to the bottom. I then pour whatever kind of milk I have on hand (I use whole, 2% or 1%- I have never tried skim) over the top until the one cup measuring cup is filled to the top or to the one cup line. Then I Let the milk and lemon juice mixture set for several minutes before adding it to my recipe. Viola! No need to run to the store, no need to spend extra money!! I am all for cutting corners (as long as they work and don't come back to haunt you in the end) and not spending unnecessary money. I promise that cutting this corner will not come back to haunt you!

Now here is the recipe I promised you so you can use the little substitution secret that I taught you! Oh, and pat your self on the back for learning something fun and new and cost efficient. Pass this trick on to your other food loving chefs, and friends. They will be happy you did! :)

Easy Buttermilk Pancakes
recipe from the kitchen of Myra Smart

Ingredients:
1 c. Buttermilk, or use the secret I shared with you.
1 egg, beaten
1 c. flour
1 T. sugar
1 tsp. baking powder
1/2 tsp. soda
1/2 tsp. salt
1 T. oil

Directions:
Combine all of the ingredients together until well combined. Pour onto a hot griddle and cook until golden brown. Flip pancake and cook until browned. Top with butter and maple/fruit syrup! Viola! You have some of the most delicious, fluffiest pancakes to serve to your family!

I hope you enjoy this recipe, as well as, this helpful kitchen tip! Check back next Tuesday for another helpful kitchen hint!

I

Ashlee, The Culinary Queen

Sunday, January 2, 2011

"Sew Into Quilts" Giveaway

*****Give away is now closed!*****
I know that I promised you all that I would start my new Meal Time Monday Feature today but I thought I would postpone that until next week so that I could feature a new friend of mine and Give away one of her adorable Crocheted Head/Ear Warmers. I heart giveaways so I didn't think y'all would mind! Wink, Wink!


I am so excited to introduce my friend, Shauna Burnett from Sew Into Quilts. Click on the link to check out her and her adorable blog and business!


Shauna has fallen in LOVE with crafting! Her love affair with crafts covers a broad spectrum of darling handmade items! Shauna loves quilting and designs her own original patterns. If you have ever stepped into a Material Girl Quilts Fabric store you may have seen some of her patterns featured and sold there. Material Girls Quilts Fabric Store is my all time favorite place to shop for all my sewing needs! Stop on by some time, I promise that you won't be disappointed with their selection of super cute fabrics and patterns.

Here are some of Shauna's Quilts...
.

I love this one, it is my personal favorite with the bright red, blue, greens and browns!

I also love this one! This would be darling in a boy's room!

This talented lady has some mad quilting skills!
What beautiful quilts! I would love one (or two) of these beautiful works of art for my bedroom!

Shauna also makes adorable quilted bags! I have ordered one for myself and have seen Shauna's handy work first-hand and Boy, are these darling bags!


Shauna also loves to make jewelry and darling crocheted head warmers for little girls, teenagers and adults. I also have ordered a couple of these for me and my little girl! They are "sew" cute and are just the accessory that you need to keep your head and ears warm on those cold January days when you are out and about!


There are so many adorable customized items that Shauna can make for you! Head on over to her blog Sew into Quilts to view pricing and to check out the other cute quilts, baby blankets, bags, jewelry and crocheted headbands she has to offer! Let her custom make something for you today!

Shauna has agreed to give away this darling Head warmer to one lucky Culinary Queen Bee Reader! I extend a BIG THANK YOU to her for sponsoring this giveaway for me today.


If you are interested in winning the adorable head warmer, you have 3 chances to put your name into the drawing!

#1. Become a Follower of The Culinary Queen Bee Website and leave a comment for me saying that you are a follower in the comments. If you are already a follower, then also leave me a comment! I love to hear from my readers!

#2. Head on over to Sew into Quilts and become a follower. Come back here and leave me a comment telling me that you are a follower.

#3. Check me out, The Queen out on Facebook and "like" me! Leave me a comment there telling me that you "like" and follow me there! :)

****Giveaway will end Friday January 7th, 2011****
Good Luck!

I

Ashlee, The Culinary Queen

Saturday, January 1, 2011

Easy No-Bake Cherry Cheesecake


Cheesecake is one of my all time favorite desserts but much to my dismay it is laden with calories! This cheesecake is a slightly less fattening version plus you don't have to bake it! It starts with a homemade graham cracker crust or if you are short on time you can buy and use a pre-made one that you can purchase at the store in the baking section. The filling in this dessert, is a combination of Dream Whip and a brick of cream cheese whipped to a light and fluffy texture. The topping can be your choice of pie filling. My personal favorite is CHERRY. I like to make my cheesecake the day before I serve it so that all the flavors have time to marry each other (or blend). :D Speaking of lovely things like getting married...Valentines Day will be here before you know it so this would be the perfect dessert to make for that special sweetheart in your life! I made this cheesecake for my sweetheart for our very first Valentines Day we were together and boy was he impressed. I make this cheesecake for him every year during the month of February. Out of all the dishes that I made my sweet husband when we were dating, I think this is the dish that sealed the deal for him! I think he knew he couldn't live without me and my cooking. Tee hee. Especially with the crunchy sugary crust, creamy dreamy filling and the bright cherry red filling that tops this dessert, it is a sure fire way to tell some one that you LOVE THEM! Make one for the sweetheart in your life... they will be glad you did!

Easy No-Bake Cherry Cheesecake
from the kitchen of Wilma DeMille (my madre)
Ingredients:
1 Premade Graham Cracker Crust or make your own
1 envelope dream whip
1 8oz. pkg. cream cheese
1 16 oz. can Cherry Pie filling

To Make your own crust:
1 individual package of Graham Crackers, crushed
3 Tbsp. white sugar
3 oz. butter, melted

Directions:
In a medium sized bowl, combine crushed Graham crackers and melted butter and sugar. Mix well and mold to the contour of pie plate. Brown in a 350 degree oven for 5-8 minutes. Watch closely so it won't burn.

For filling:
Whip dream whip envelope according to the package instructions. In another bowl beat cream cheese until smooth. Then combine both mixtures. Pour into the prepared graham cracker crust. Let it set for a few minutes. Then Top with the pie filling and chill over night.

I

Ashlee, The Culinary Queen

A New Year of New Features...


Happy New Years on this very first Day of 2011! How was everyone's Christmas Holiday? What did you do that was fun? What are your New Year's Resolutions? I know I have a few resolutions that I have already started working on! I know that I have been a little scarce around these parts since Christmas Eve but my much needed hiatus was spent hanging out with family, cooking, sprucing up my laundry room and organizing my kitchen. I promise to share what I have been up to during the up coming weeks of 2011! So stay tuned!

I am so eager to get back to cooking and blogging about what I cook. Be prepared for an overload of fun things because I am back and will be blogging with a vengeance. I am so excited to announce that I will be sharing some new things with all my Culinary Queen Bee viewers this year. During each week I will be adding a few new features to my blog. I truly am looking forward to these new features and I hope all of you will look forward to them as much as I am.

Monday's Feature will be called MEALTIME MONDAYS. Meal time Mondays will include a healthy and easy main dish. I will be on a quest to find easy, healthy and delicious meal ideas to help spruce up your dinner rotation to prevent us all from getting into that dinner time rut.

Tuesdays- KITCHEN TIP TUESDAYS. This will cover a broad spectrum of helpful hints- kitchen tips, ingredient substitution ideas, organizational ideas, and product reviews on my favorite kitchen gadgets to make your time spent in the kitchen easier and more enjoyable.

On Fridays, I will be featuring a yummy treat to take you into your weekend. Life should be celebrated and I love when the weekends roll around. I love celebrating the weekends by making a special dessert to share with my family, friends or sweetheart (or to all three)!

I hope you will check back often during the upcoming year to see what I am up to! As always, I look forward to hearing from you and reading your feedback.

Happy New Years and May 2011 be your best yet!

I

Ashlee, The Culinary Queen

Related Posts Plugin for WordPress, Blogger...