Thursday, March 31, 2011

Little Grow Peep Topiary Tutorial


HAPPY SPRING! 

Both of these crafts make me HAPPY!


The Daffodil was by My Little Guy. He made his darling flower during his art class in Kindergarten this week! It was so cute and bright that I put it up on his artwork board in his room so our whole family could admire it when we come in out and out of his room during the day!  I also appreciated the fact that the center of my little guys daffodil was made with a cupcake liner. So cute!

This Tute also makes me giddy with excitement! Spring is here and that means (hopefully) no more SNOW for me and those that live in my neck of the woods!
I am not holding my breath though... I do live in Northern Utah and we are known for having Snow Fall as late as June! Uggg! Please send Warm Wishes my way! Please? I need to thaw out! :D


With the Welcoming of Spring, we also have the Easter Holiday just around the corner! I came across this Darling Peep Topiary Idea in the April Edition of Women's Day Magazine. I thought that it was such a darling craft that I wanted to make a couple to add to my existing supply of Easter Decor.

 This Craft is "cheep" and easy and is made using a classic Easter Candy. I love the results!

Now, Let's get on with the Tute why don't we?

 Supplies needed to Make ONE "Peep" Topiary:

4 inch Green Flower Foam
Newspaper
41/2 X 5 green mini flowerpot (Found some cute ones on Sale at Hobby Lobby in their Garden Dept.)
11 inch dowel
Green Paint- I used Delta Creative Ceram Coat "Leaf Green" (Find it at your local Craft Store with the other Acrylic Paints
1/2" paintbrush
Hot Glue gun and Glue sticks
6" plastic embroidery hoop (I purchased mine from Hobby Lobby and bought the Susan Bates Hoop-La Brand embroidery hoop.)
3 packages of 5- count yellow chick Peeps marshmallow candies
Green Decorative Easter Grass
Ribbon (Green or Yellow)

How to assemble your Peep Topiary:

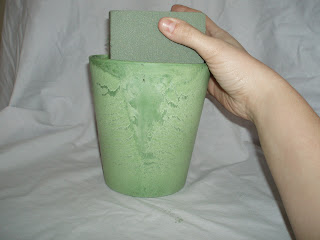
Step 1. Place the green foam length wise into your pot. Make sure it fits snugly and isn't visible over the top of the edge of your pot.


Step 2. Paint your wooden dowel green  and let it completely dry. I didn't take a picture of this because I figure we all know how to paint. *Wink*

Step 3. Take the inside piece of the Embroidery loop out and discard or save for another craft. After you have separated the embroidery hoop, apply a generous amount of hot glue to the top of the dowel and secure it to the screw at the opening of the embroidery hoop. Let Dry.


Step 4. Remove Peeps from the package but DO NOT SEPARATE!! Apply a thick line of hot glue to 1/3 of the front side of the embroidery ring. Gently press on group of five peeps onto the glue with beaks facing  the center of the circle, slightly bending them to cover the ring. Let Dry. I held mine in place for a few minutes until the Glue hardened. Repeat with the other two groups.


Step 5: Stick the bottom part of the dowel into the center of the foam so that the stem stands upright. Cover the top of the pot with green Easter grass. If desired, lightly mist the Peeps Flower with a Craft Sealer to Preserve it. 

Step 6: Take your ribbon (any Color) and tie a bow or a knot in the middle of your wooden dowel for a little extra pizazz. 

Pat yourself on the back for finishing this cute Craft. Now that your finished, go and display your cute little Peep Topiary in a place where you can admire it all through the Easter Holiday!

This is would be a darling Centerpiece for your Easter Feast!


HAPPY CRAFTING!

I

Ashlee, The Culinary Queen

Tuesday, March 29, 2011

Cheddar Bay Biscuits

This past weekend, my hubby and I ordered in from one of my favorite Restaurants- Red Lobster. I have a few favorite dishes on their menu, in which I dream about from time to time. (I know, is it silly to dream about food? NEVER!! *WINK*). A few of my favorite dishes at Red Lobster is their Crab Linguine and their Coconut Shrimp with Coconut Dipping Sauce. Each of these entrees rank really high on my food list of Favorites. I also have another favorite which is not an entree-their Cheddar Bay Biscuits. These biscuits are truly out of this world! I swear we have our waiter or waitress bring us 3 platefuls when we eat there! Wow! What little piggies we are! I know we have NO SHAME when it comes to food! Good thing I try and work out everyday! :)
However, For those times that we can't make it to Red Lobster, I like to whip up a batch of Cheddar Bay Biscuits at home. This recipe came into my possession back in College when I was taking a Cooking class and has stayed in my cook book since. These biscuits are perfect to serve along side a soup or seafood dish. I like to serve mine when I make my super Yummy Sausage and Shrimp Gumbo or even a long side my Grilled Chicken Pasta with Creamy Tomato Sauce.
Try making some of these light and fluffy biscuits the next time you have a soup or pasta dish for dinner!

Cheddar Bay Biscuits
Ingredients:
1 c. bisquick mix
1/4 c. cheddar cheese, shredded (sometimes I use a little more cheese)
1/3 c. milk
1 Tbsp. Italian Salad Dressing
1/8 tsp. garlic powder
1/8 tsp. dried parsley
2 Tbsp. Butter

Directions:
Preheat oven to 450 degrees F. Line a baking sheet with Parchment paper. In a mixing bowl, combine baking mix, cheese, salad dressing and milk. Mix until dough is firm. Place dough on prepared pan using a small spoon or scoop.
Bake for 10-12 minutes or until Golden Brown. 
Combine melted butter, garlic powder and parsley in a small bowl. Brush over baked biscuits immediately after removing them from the oven. Serve Warm and Enjoy!

I

Ashlee, The Culinary Queen

Monday, March 28, 2011

Peanut Butter Chocolate Chip Cookies

Reese's Peanut Butter Eggs are one of my most favorite Easter Candy. Who can resist that Peanut Butter/Chocolate ratio? Chocolate and Peanut butter together in my opinion is a match made in heaven and whomever decided to put both chocolate and peanut butter together and make the Reese's Peanut Butter Eggs should be given a Noble Peace Prize or at least some form of great accolades and acknowledgements! At least I think so. Maybe I should petition for a Reese's Peanut Butter Holiday!

Awww. Bliss.

 Each Easter I buy bags and bags of these individually wrapped gems and gorge myself silly. Last night, I was craving the little gems but wanted to try my hand at creating a cookie that tastes like them. I think I succeeded! These cookies are so soft and chewy and seriously melt in your mouth! Just Like Peanut Butter Eggs! All you need to make these cookies is some good peanut butter and a bag of these:

They Make all the Difference. I Promise. Hey, The Queen Doesn't Lie especially when it comes to Food. *Wink*

Peanut Butter Chocolate Chip Cookies
Ingredients:
3/4 c. Creamy Peanut Butter
1/2 c. Butter Crisco
1 1/4 c. Brown Sugar
1 egg
3 Tbsp. Milk
1 1/4 tsp. Vanilla
1 c. flour
1/2 tsp. Salt
1/2 tsp. Soda
1 Bag of Nestle Peanut Butter and Milk Chocolate Chip Morsels


Directions:
Combine peanut butter, butter Crisco and brown sugar in A medium sized mixing bowl. Stir these 3 ingredients together and Slowly add egg and milk. Stir. Add remaining ingredients and stir until well combined. This is a very soft dough. Place spoonfuls on parchment paper  line cookie sheet and bake at 350 degrees for 10 minutes. 

I

Ashlee, The Culinary Queen

Saturday, March 26, 2011

Laundry Room Makeover Reveal

I am really excited to share with you all a project that I have been working on. This project has been in the works since January. After living in our home now for 2 years I thought it was about time to try my hand at doing a remodel for my boring Laundry Room. Any one that knows me knows that I have two dislikes when it comes to housework: doing dishes and washing and folding laundry. Laundry is especially tedious for me with two young kids, maybe it is because it seems like once you finish the task, you immediately have to start over the next day with washing, folding and more washing. Do any of  you feel this way about doing Laundry or is it just me?

It was my New Year's Resolution this year, to tidy and organize this space in hopes that it would be a more pleasant place to do one of my most undesirable tasks. I came up with this equation...Cute Room + Tidy Space= A Joyful attitude towards Laundry (washed and folded). It makes sense to me! *Wink*

In my Laundry Room there is no natural light. It is the darkest room in the house and is just. plain. dreary. With this makeover, I wanted to brighten the room and warm it up. I first painted the room in Warm Caramel colored Behr paint and then painted the shelf and baseboards white. 

I am in Love with Reds when it comes to interior decorating. In fact, my Kitchen has pops of Reds every where so I thought I would continue that and bring the red scheme into my Laundry Room. Red is a wonderful color to use when you are wanting to warm up a room and add a splash color. 

One of my favorite places to shop is Target. I love the variety that they have and you can always count on them having good quality merchandise. To add that pop of red to my Laundry Room, I found and purchased a new shag rug to warm up the space as well my little feet. I love this rug, it has flecks of dark purples, reds and burgundy's and is really inviting especially since my feet prefer standing on it rather than the cold tile floor. 

On the day I found my rug, I also perused the home decor aisle and scored some beautiful red silk flowers and a black vase for over 50% off. SCORE! Using flowers to decorate spaces helps freshen things up!

Other items that I used to decorate this space was wicker baskets, a class jar to hold my Oxyclean, a berry wreath, all of which I already had on hand. Also, One of my besties heard that I was in search of a Wooden window and had one on hand and gave it to me! What an awesome friend right? I know. She is the best! 

 The window mirror adds a lot of light and gives the room depth. This helps to give the room the appearance that is bigger than it really is.

I also made this darling craft that I purchased from Makia Creations to hang onto some of those socks that have lost their mates!
 Laundry Room Before Makeover:
Look how boring and drab this ugly space was!

The Big Reveal!

Hung this mirror above the sink to give the room a little more dimension and add a little more light! I want to add a little towel holder on the wall so my kids can wash up in the laundry room before meals instead of dirtying up the guest bathroom! :)
Found this Wire Mesh Ironing Board Holder At Amazon to hold my Ironing Board and Water Bottle and Starch. (Don't look to closely at the ironing board cover. That is my next project...make a matching ironing board cover. Don't you think I deserve a new one after 8 years of marriage? I do. The scorch marks are so attractive!
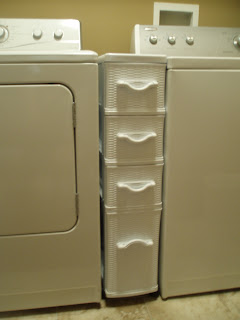
I also found this little caddy at Amazon.com. I put all my odds and ends in it like detergent and dryer sheets. It definitely hides the clutter and keeps things organized!

Next on the list, is to purchase a tool organizer to hide the broom, mops and dusters behind  the door instead of shoving them to the side of the washer!

I am really excited with the results of my Laundry Room. There are a few more finishing touches that I would like to add eventually but as for now, I am really enjoying my new bright and cheery Laundry Room space.

 I have to admit too, doing the Laundry has become a more pleasant task as well. Hurray! Mission and New Years Resolution Completed! :D

I

Ashlee, The Culinary Queen

Friday, March 25, 2011

Smoky Bean & Bacon Soup


There is nothing more comforting than eating a warm bowl of soup on a chilly winter or spring evening.  This delicious homemade version of the classic soup is one that will become a family favorite with its slightly smooth and creamy texture and smoky garlic flavors- it truly is comfort food at its finest! I like to serve this soup with a slice of freshly baked bread or rolls with butter on the side for an extra comforting dinner!

Smoky Bean and Bacon Soup
recipe adapted from ourbestbites.com

Ingredients:
12 slices bacon
1 c. onion, diced
11/2 T. garlic, minced
2 c. diced ham
2 (15 ounce) cans Great Northern Beans, drained and rinsed
1 t. smoked paprika
1/2 t. kosher salt
1 (32 ounce) box chicken broth
2 medium red potatoes, diced into bite sized pieces

Directions:
Cut the bacon into bite sized pieces with kitchen shears. Place bacon into a large stock pot and cook until crisp. Remove bacon and let drain on paper towels. Reserve 2-3 t. bacon drippings in the pan discard the rest of the grease. (Don't pour grease down the drains in your sink!! Discard in an empty can into the garbage.)

Add the diced onion to the pan and saute for about 2 minutes. Add the garlic and cook for an additional minute. Add the ham, beans, paprika and salt to the pan and stir to combine. Then add the broth and potatoes. Bring the soup to a boil and then reduce to a simmer. Simmer for 10-15 minutes  or until the potatoes are tender. Remove from heat and stir in bacon. Use an immersion blender, if you have one, and blend until completely smooth. If you don't have an immersion blender, you can use a regular blender. Lade 3 cups of soup into the jar and pulse until smooth. Add back into the pot with remainder of soup and stir to combine. Add salt and pepper if desired. Lade into bowls and serve with freshly baked bread or rolls.

I

Ashlee, The Culinary Queen

Grilled South Of the Border Chicken


I am always looking for different ways to "spice" up our South of the Border taco night at my house. I am constantly trying to break out of the same old rut we seem to keep finding ourselves in. We usually use seasoned ground turkey to fill our tacos shells at my home but I recently found this delicious Grilled Taco Chicken Recipe that was a huge hit with my kids and my hubby. This grilled chicken was very simple to make and you can use it to fill taco shells, tortillas or even burritos. If tacos aren't quite your forte, serve this chicken on top of a bed of Romaine Lettuce for a delicious and healthy taco salad! 

Grilled "South of the Border" Chicken
recipe adapted from ourbestbites.com and photo courtesy of blogchef.com
Ingredients:
1 lb. Boneless, Skinless chicken breasts
2-3 juicy limes
1-2 T. Red Wine Vinegar
3 cloves garlic, minced 
1 t. chili powder
1/2 t. cumin
1/2 t. Kosher salt
1/2 t. freshly ground pepper
1 bag of shredded Coleslaw mix
Sour Cream
Gaucamole
Tortillas
Salsa

Directions:
1. Place the chicken breasts in a heavy-duty Ziploc plastic bag.
2. Squeeze limes over chicken. Add vinegar and minced garlic and seal the bag and shake to distribute the marinade. Marinate for 4-8 hours or over night.
3. Preheat grill to medium-high heat.
4. Combine chili powder, cumin, salt and pepper in a small bowl. Remove chicken from bag and discard the unused marinade. Rub the spices into the chicken.
5. Place chicken breasts on the hot grill. Grill for 7 minutes, turn and grill for another 5-7 minutes. Remove from heat to a clean plate and allow to stand for 5 minutes before slicing and serving. If using the meat for tacos, place chicken in a warm tortilla and top with shredded cabbage, sour cream, guacamole,  and salsa.

I

Ashlee, The Culinary Queen

Wednesday, March 16, 2011

Bacon & Artichoke Penne Pasta Bake

Pasta recipes are some of my favorite to make for my family- not only are they kid friendly but they are impressive enough to serve to impress friends and family! This particular recipe starts with a Alfredo Sauce that is light and won't leave you weighed down. Add crispy bacon, artichoke hearts, green onions, mozzarella and penne pasta to the mix and you have a elegant dish fit for a King or Queen!!

Guiltless Alfredo Sauce
recipe adapted from ourbestbites.com
Ingredients:
2 c. low-fat milk
3 oz. low fat cream cheese
2 T. flour
1 teas. kosher salt
1 T. butter
3 garlic cloves, minced
1 c. freshly grated Parmesan cheese

Directions:
1.In a blender, blend the milk, cream cheese, flour and salt until smooth and set aside.
2. In a large; nonstick sauce pan, melt butter on medium-high heat and add the garlic. Saute the garlic for about 30 seconds, stirring constantly to prevent the garlic from sticking and burning.
3. Add the milk mixture to the pan. Stir constantly for 3-4 minutes or until it just comes to a simmer. Keep stirring and let it cook for a few minutes more or until the sauce thickens, about 6-7 minutes.
4. Once the sauce has started to thicken remove from heat. Whisk the cheese into the sauce and immediately cover the pan. Allow to set and stand for at least 10 minutes before using.
5. Serve immediately or refrigerate leftover for up to 5 days.

Bacon & Artichoke Penne Pasta Bake
recipe adapted from ourbestbites.com

Ingredients:
8 ounces Penne Pasta
1 Guiltless Alfredo Sauce
2 Chicken Breasts, grilled and chopped
6 oz. cooked bacon, chopped
1 jar marinated artichoke hearts, drained and chopped
1/2 c. chopped green onions
1 c. shredded mozzarella cheese, divided
salt and pepper, to taste.

Directions:
1. Preheat Oven to 350 degrees.
2. Prepare pasta according to package directions.
3. While the pasta is cooking, prepare Guiltless Alfredo Sauce. When Pasta is done, drain and add to the sauce. Toss with chopped chicken, bacon, artichokes, green onions, 1/2 c. mozzarella. Season to taste with salt and pepper.
4. Transfer mixture to an 8X8 baking dish and sprinkle with remaining 1/2 c. mozzarella cheese. Cover with aluminum foil and bake for 20 minutes or until heated through and cheese is bubbly.

I

Ashlee, The Culinary Queen

Teriyaki Chicken Salad

As the weather warms up, I like to look for recipes that are on the light side to serve to my family for lunch and dinner. This is an easy recipe to make; especially on those warm days when you don't want to heat up your kitchen. This Grilled Teriyaki Chicken recipe is tossed with green onions, tropical fruits and mixed in a creamy teriyaki sauce. Serve this salad on a bed of crisp lettuce or on sliced croissants.


Teriyaki Chicken Salad
recipe adapted from ourbestbites.com

Ingredients:
2 chicken breasts
11/2 c. Kikkoman Teriyaki baste and glaze
2 stalks celery, finely chopped
1/3 c. sliced green onions, chopped
1/3-1/2 c. light mayo
1 mango, cut into small cubes or 1 (6 oz. can) Mandarin Oranges
1 (8 oz. can pineapple tidbits or roughly chopped chunks
1/4 c. sliced almonds
salt and pepper to taste
Croissants or pitas
Lettuce leaves

Directions:
Reserving about 2/3 c. of Teriyaki sauce, marinade chicken in the remaining sauce for at least 4 hours. Grill chicken on medium heat for about 7 minutes per side, basting regularly with some of the reserved sauce. While the chicken is grilling, combine the celery and green onions in a small mixing bowl or a plastic storage container with a lid. When the chicken is done, allow to stand for about 10 minutes and then cute into bite-sized pieces. Toss with celery and onions and then add may and mix thoroughly. Start with 1/3 c. and go from there. Add 2-3 T. Teriyaki sauce to taste. You want some of the teriyaki flavor, but you also don't want it to be overwhelming. Refrigerate for at least 4-6 hours. Just before serving, add mango or oranges, pineapple and nuts. Season with salt and pepper to taste. Serve with lettuce in a croissant or pita or on a leaf of lettuce.

I

Ashlee, The Culinary Queen

Thursday, March 10, 2011

Key Lime Pie Cupcakes


As many of you may know by now, I am a sucker for cupcakes; and I am always on the look out for new and delicious cupcake recipes. Well today, I have a delicious cupcake recipe for you and just in time for the Spring Season! Boy, are you "lucky!" This cupcake recipe truly embraces everything that I think Spring should be: light, airy, scent awakening, and fruity. These cupcakes deliver just that and pack quite a punch in the kisser with their key lime pudding centers. A whipped cream frosting made with real cream and powdered sugar tops these little beauties. These cupcakes have just the right amount of tartness/sweetness ratio and are so elegant and pretty that they would be the perfect ending to any St. Patrick's Day or Easter Dinner Celebration! I hope you enjoy these little gems because I think that I might have just stumbled onto the best cupcake recipe that any "lucky little lass or gent" might be fortunate to find!

Key Lime Pie Cupcakes
recipe adapted from 101 gourmet cupcakes in 10 minutes
Ingredients:
1 white cake mix
3 eggs
1 c. half and half
1 can sweetened condensed milk
6 Tbs. Key Lime Juice ( I used lime juice)
4 Tbs. Grated lime peel (about 2 limes for garnish)

Baking Instructions:
Mix together cake mix, eggs, half and half, and 3 T. key lime juice. Pour 1-2 T. of cake batter into each cupcake paper liner. In a separate bowl, mix sweetened condensed milk and rest of the lime juice. Evenly divide lime milk into batter-filled cups. Tops with remaining batter until 3/4 full.

Bake at 350 degrees for 15-18 minutes or until cake springs back when touched lightly. Remove from oven and cool completely on a wire rack.

Frost cupcakes with frosting and garnish with grated lime peel.

Yields: 18-24 cupcakes

Whipped Cream Frosting
Ingredients:
2 c. heavy cream
1/4-1/2 c. powdered sugar (depending on preference)

Directions:
Pour cream into a large mixing bowl and start mixing at low speed. Gradually increase speed until cream thickens and soft peaks form. Turn off mixer and add sugar. Start slowly again- no messes today! Beat until stuff peaks form. The stiffer the cream, the easier it is to frost the cupcakes. Keep refrigerated.

I

Ashlee, The Culinary Queen

White Chicken Chili


Even though Spring time usually brings warm days, there are still a few days when the weather can be a little bit blustery and chilly. On those blustery, chilly spring days, my little family and I love to hunker down and hibernate in our warm home and eat warm soups, chili's and stews. Having something comforting to eat definitely lifts the spirits, warms the tummy and soul. I came across this tummy and soul warming recipe recently and it has truly become one of my favorite chili's to make this winter/spring. This white chicken chili is filling but isn't as heavy as most chili recipes end up being.

I love that This chili has just a touch of heat from several of the ingredients but can easily be tailored to fit your individual family's liking. To control and balance out the heat, my little family enjoys adding a dollop of sour cream and a sprinkle of Monterey Jack Cheese to the top of each bowl! May your souls and tummy's stay warm this spring with this delicious Chili recipe.

White Chicken Chili
recipe and photo courtesy of blogchef.com

Ingredients:
1 T. vegetable oil
1 onion, chopped
3 garlic cloves, crushed
2 (4 oz) cans mild chopped green chili peppers
2 t. ground cumin
1 t. dried oregano
1/4 t.-1 t. cayenne pepper (I only add 1/4 t. for my family and it provides plenty of heat for us!)
2 (14.5 oz.) cans of Chicken broth
3 c. cooked chicken breasts, chopped
3 (15 oz) cans White Beans
1 c. shredded Monterey Jack Cheese

Cooking Instructions:
Step One: In a saucepan over medium low heat add the oil. Add the onions and stir fry until tender. Mix in garlic, green chilies, cumin, oregano, and cayenne pepper. Continue to stir-fry for about 3 minutes.
Step Two: Mix in Chicken broth, chicken and white beans. Simmer for 15 minutes, stirring occasionally.
Step Three: Remove from heat and add Shredded Monterey Jack cheese until melted. Serve with warm and top with additional cheese and a dollop of sour cream.

I

Ashlee, The Culinary Queen

Wednesday, March 9, 2011

Mushroom Chicken and Rice Casserole

Happy MARCH Culinary Queen Bee Readers! I hope I haven't lost any readers during my recent hiatis... I took a little time off to spend a little more time with my family the past few weeks so I apologize for my absence from posting delicious recipes! With that said, I am extremely excited for Spring and with that I have some yummy recipes that I can't wait to share with all of you. Spring time is one of my favorite times of the year! Warm weather begins to emerge and I love the blossoms and flowers. I also love the holidays and all the yummy spring food that is served for the holidays.

Check back in the next few days for I have several new dessert Ideas that I can't wait to share with you! These desserts would be a perfect finale to your St. Patrick day dinner and will leave your guests impressed!

I do have a fabulous recipe that I can't wait to share with you all today: Mushroom Chicken and Rice Casserole. It is one of my favorite Sunday Dinners to make and serve because of it's simplicity, doesn't dirty up a lot of dishes and tastes like you spent all day in the kitchen. Even though I love this as a Sunday dish, it of course could be served on any day of the week. Now, I have to be honest, Chicken and Rice Casseroles have never been my favorite but after a good friend of mine made this for me when I came home from the hospital after having my little girl 3 years ago, it has become a family favorite in our home! This Mushroom Chicken & Rice Casserole is creamy, tasty, kid pleasing and "Oh, so comforting!" It is especially comforting on those chilly spring evenings! Hopefully, this recipe will become a family favorite in your home!

Mushroom Chicken and Rice Casserole
from the kitchen of Todd & Liz Benson
Ingredients:
1 6.9 oz. package of Chicken Rice -O-Roni
1 6.5 oz. can mushrooms (do not drain)
1 can Cream of Chicken Soup
4-6 small chicken breasts, trimmed of fat
2 c. water
Paprika

Directions:
Mix the rice-o-roni, mushrooms (juice and all), Cream of Chicken soup and water in a 9X13 pan. Once all mixed place chicken breasts on top of rice mixture. Sprinkle generously with paprika over the chicken and rice mixture. Cover with tin foil and Bake in a 350 degree oven for 2 hours or until rice is done.

I

Ashlee, The Culinary Queen

Related Posts Plugin for WordPress, Blogger...